How to Clean a Microwave: 7 Safe Steps to Remove Odours
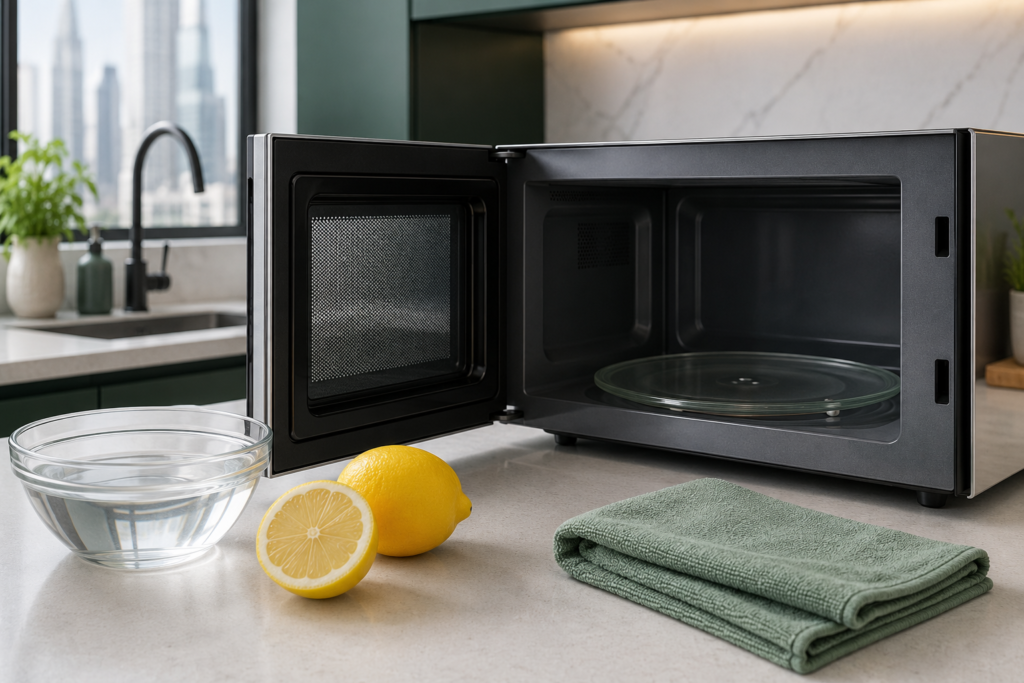
Microwave splashes, steam and strongly scented foods are a common issue in UAE kitchens, where microwaves are regularly used to reheat meals in apartments and villas. Reheated curry, fish, garlic, grilled meat, tomato sauces, popcorn, burnt rice and spiced dishes can leave residue and lingering smells inside the appliance. A smell inside a microwave does not automatically mean the appliance is unsafe or damaged, but it usually signals that food residue has built up and needs to be removed.
The method described here is suitable for everyday microwave cleaning in UAE apartments and small kitchens as well as villas, including kitchens where strongly scented foods are reheated regularly.
What You Need to Clean a Microwave Safely
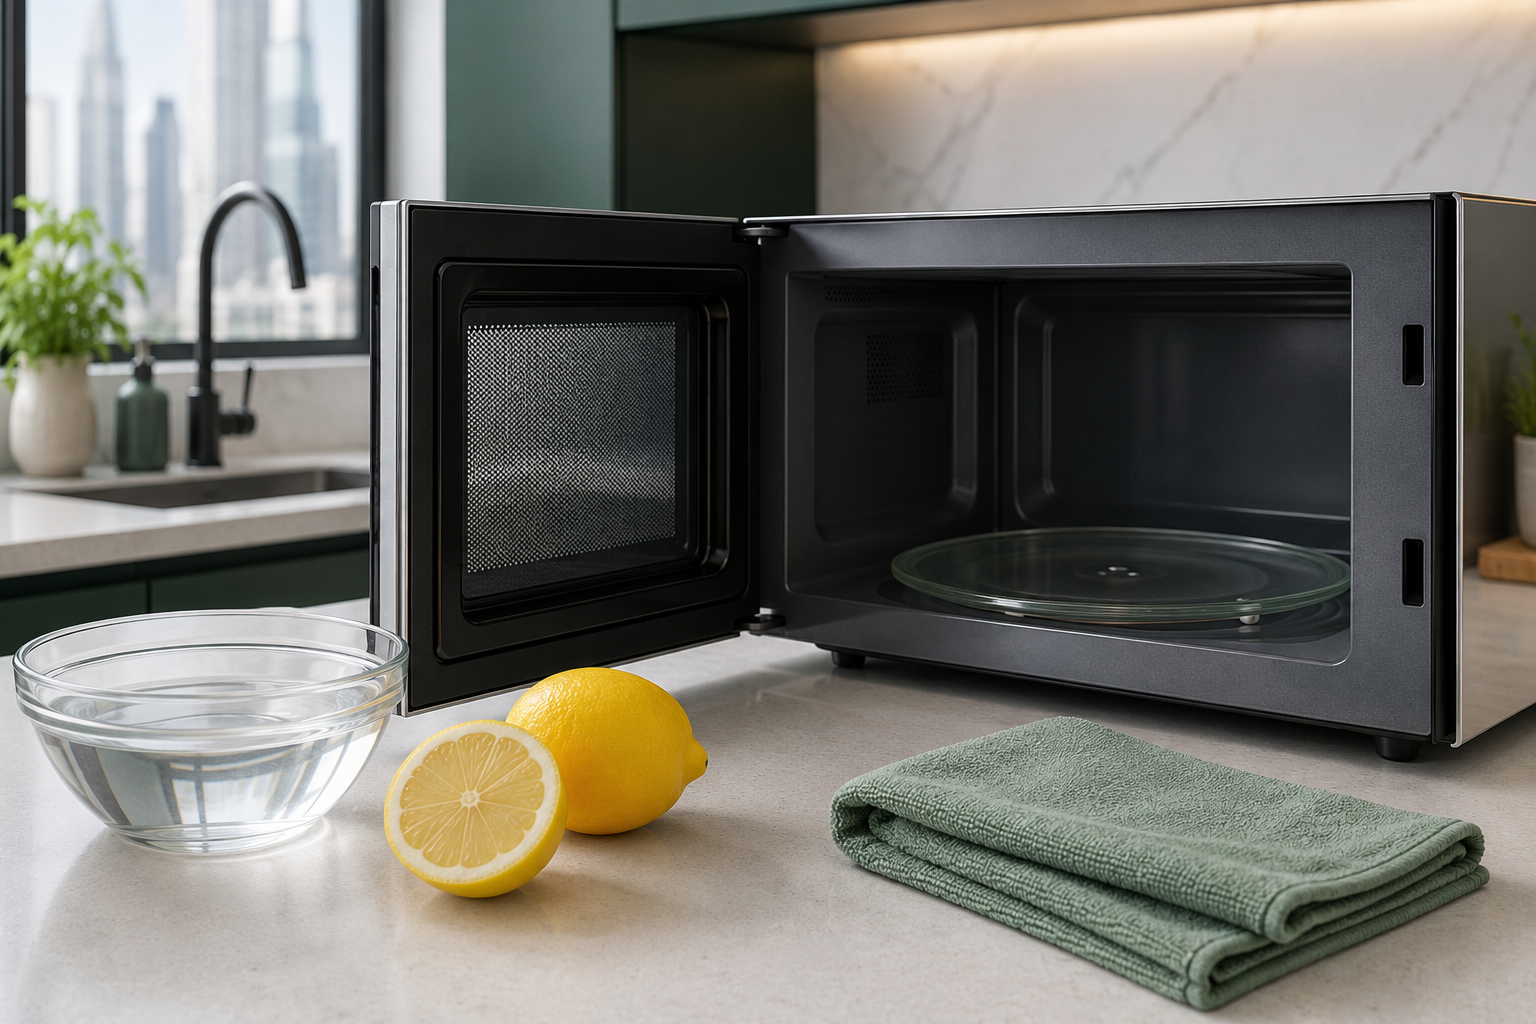
| Item | Purpose |
|---|---|
| Microwave-safe bowl or jug | Used for the water and steam stage |
| Water | Base liquid for steaming loose residue |
| Lemon | Adds a mild scent and helps loosen light residue |
| White vinegar | Diluted with water for tougher residue and odours |
| Mild washing-up liquid | For hand-washing the turntable and roller ring, or a very diluted wipe |
| Soft microfibre cloth | Wiping the interior without scratching surfaces |
| Non-abrasive sponge | Removing softened residue gently |
| Dry cloth | Drying the interior before further use |
| Baking soda | Optional odour absorption when left inside overnight, unheated |
| Soft toothbrush or small detailing brush | Reaching seals and grooves without damaging surfaces |
Metal tools, abrasive powders, bleach, oven cleaner and harsh solvents are not suitable for microwave interiors and can damage internal coatings or leave unwanted chemical residue inside the appliance.
Safety Steps Before Cleaning a Microwave
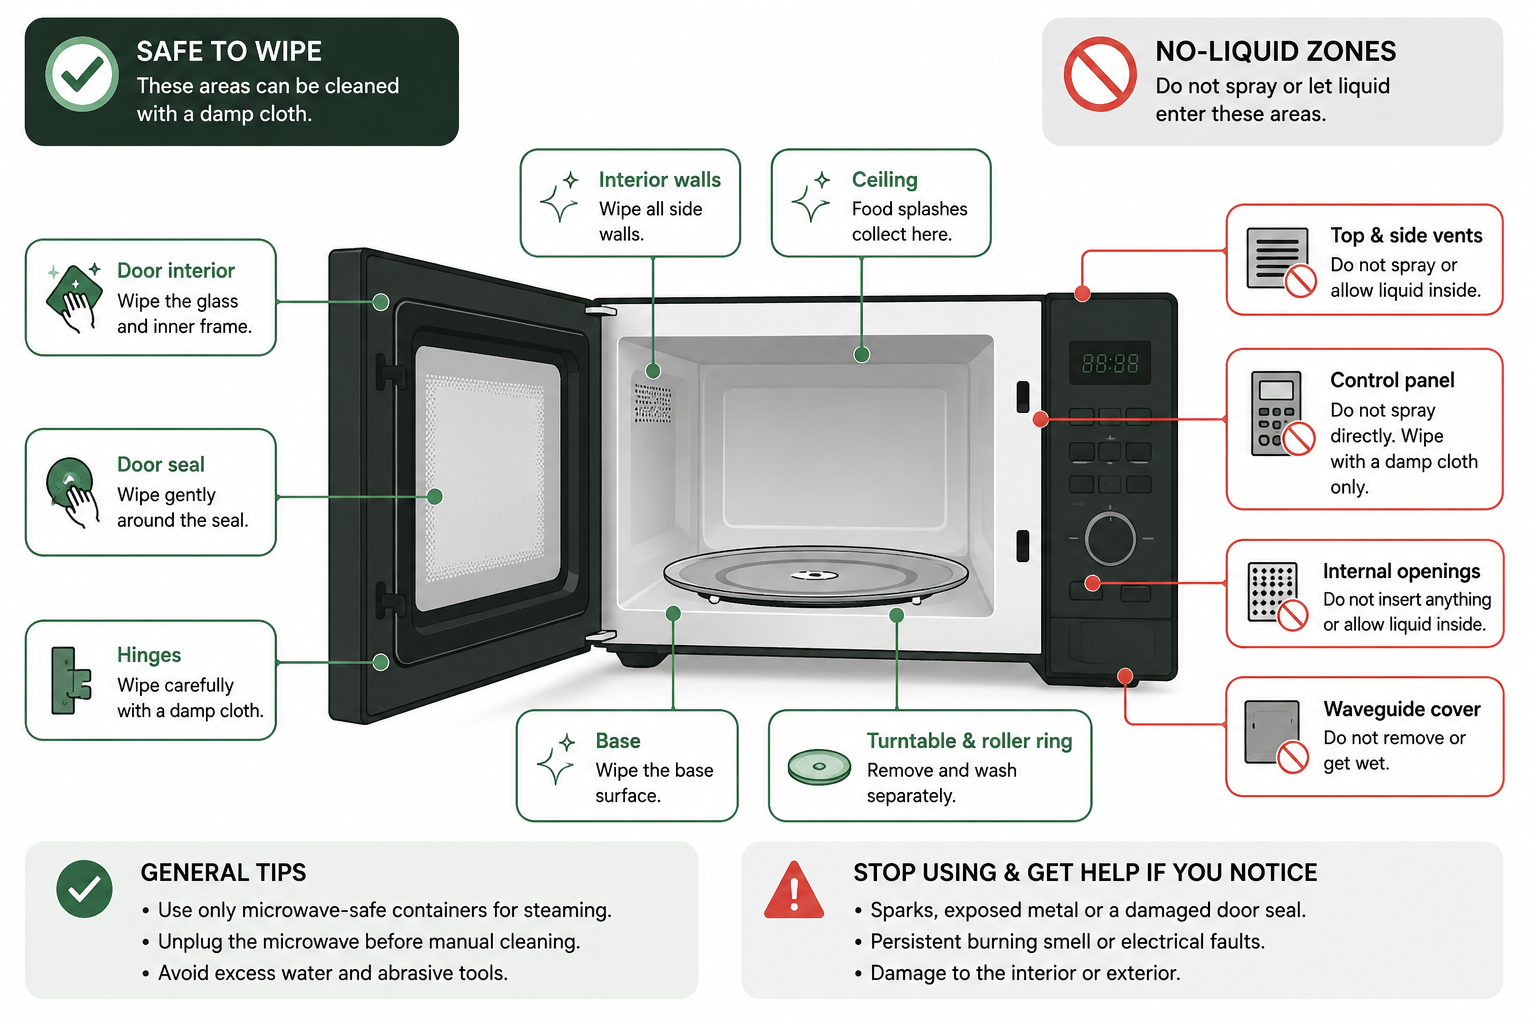
- Switch off and unplug the microwave before manual cleaning whenever the plug is safely accessible. Steam-cleaning requires the microwave to remain connected during the heating stage, so complete the heating first, then switch it off and unplug it before wiping.
- Allow hot containers and interior surfaces to cool before handling.
- Avoid spraying cleaner directly into vents, controls or openings.
- Never immerse the microwave or its control panel in water.
- Do not remove the protective waveguide cover inside the cavity.
- Avoid using excessive amounts of water during cleaning.
- Use only microwave-safe containers when steam cleaning.
- Stop using the microwave and arrange an inspection if there are sparks, exposed metal, a damaged door seal, a persistent burning smell or any other electrical fault.
Routine cleaning as described in this article applies to normal food residue and odours. Sparking, exposed metal or electrical smells fall outside routine cleaning and call for a qualified technician. This is broadly consistent with the U.S. Food and Drug Administration’s guidance on microwave ovens, which recommends regular cleaning of the cavity, door and outer edge with water and a mild detergent, and advises against scouring pads, steel wool or other abrasives.
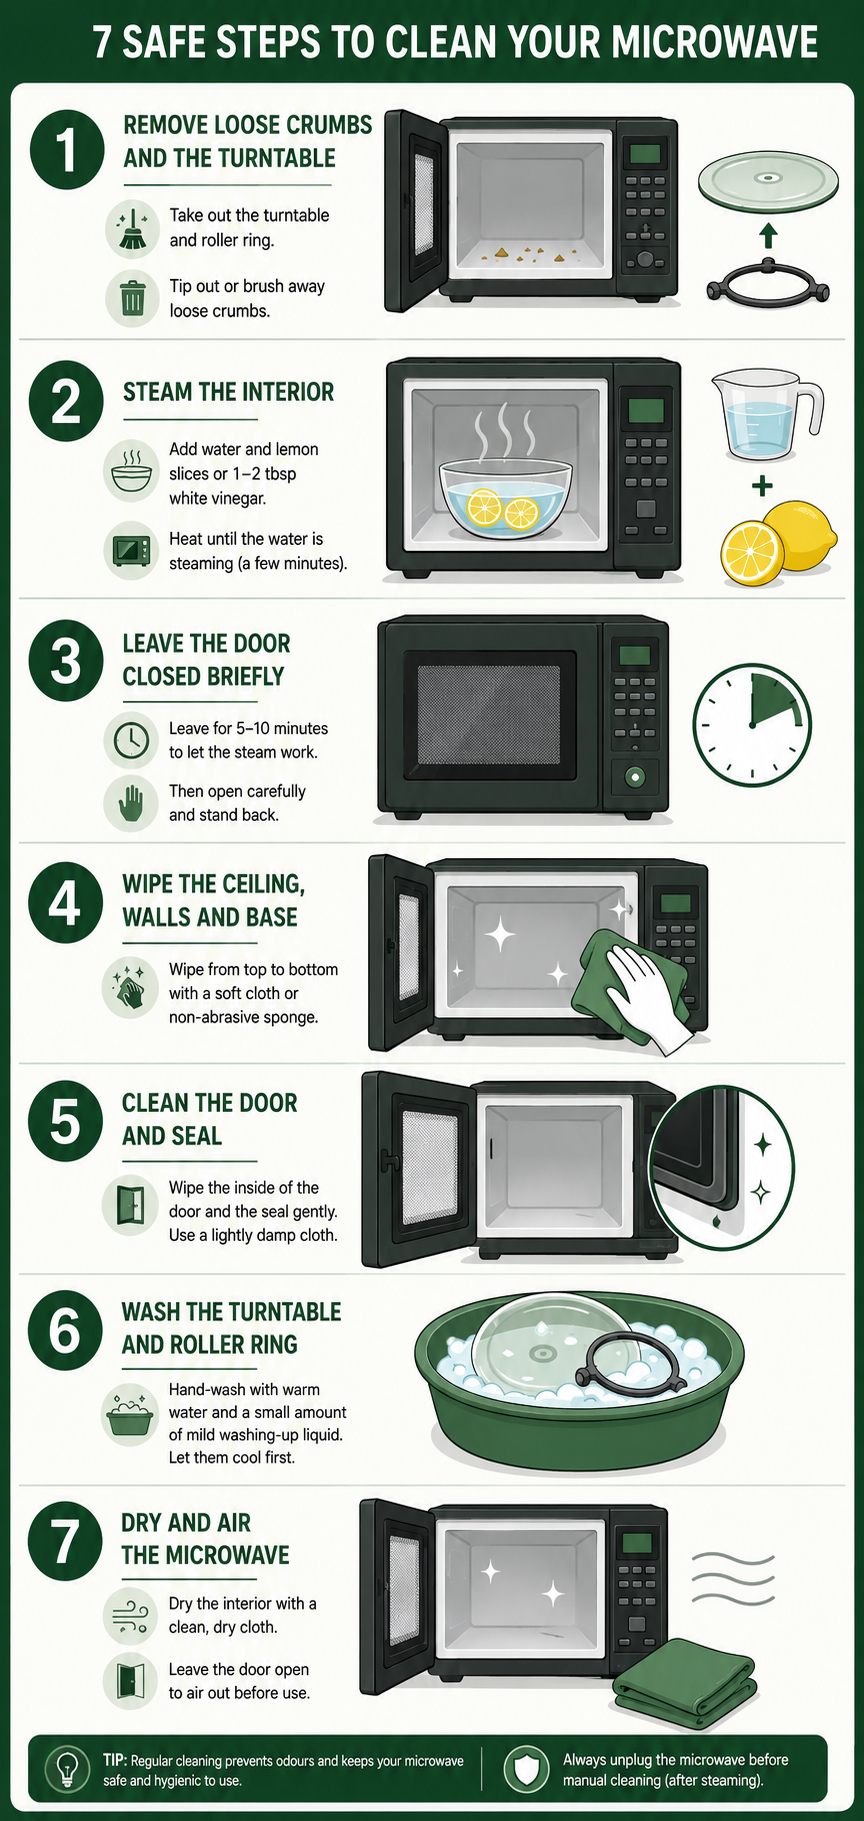
How to Clean a Microwave in 7 Safe Steps
Step 1: Remove loose crumbs and the turntable Take out the turntable and roller ring, then tip out or brush away loose crumbs from the cavity before introducing moisture.
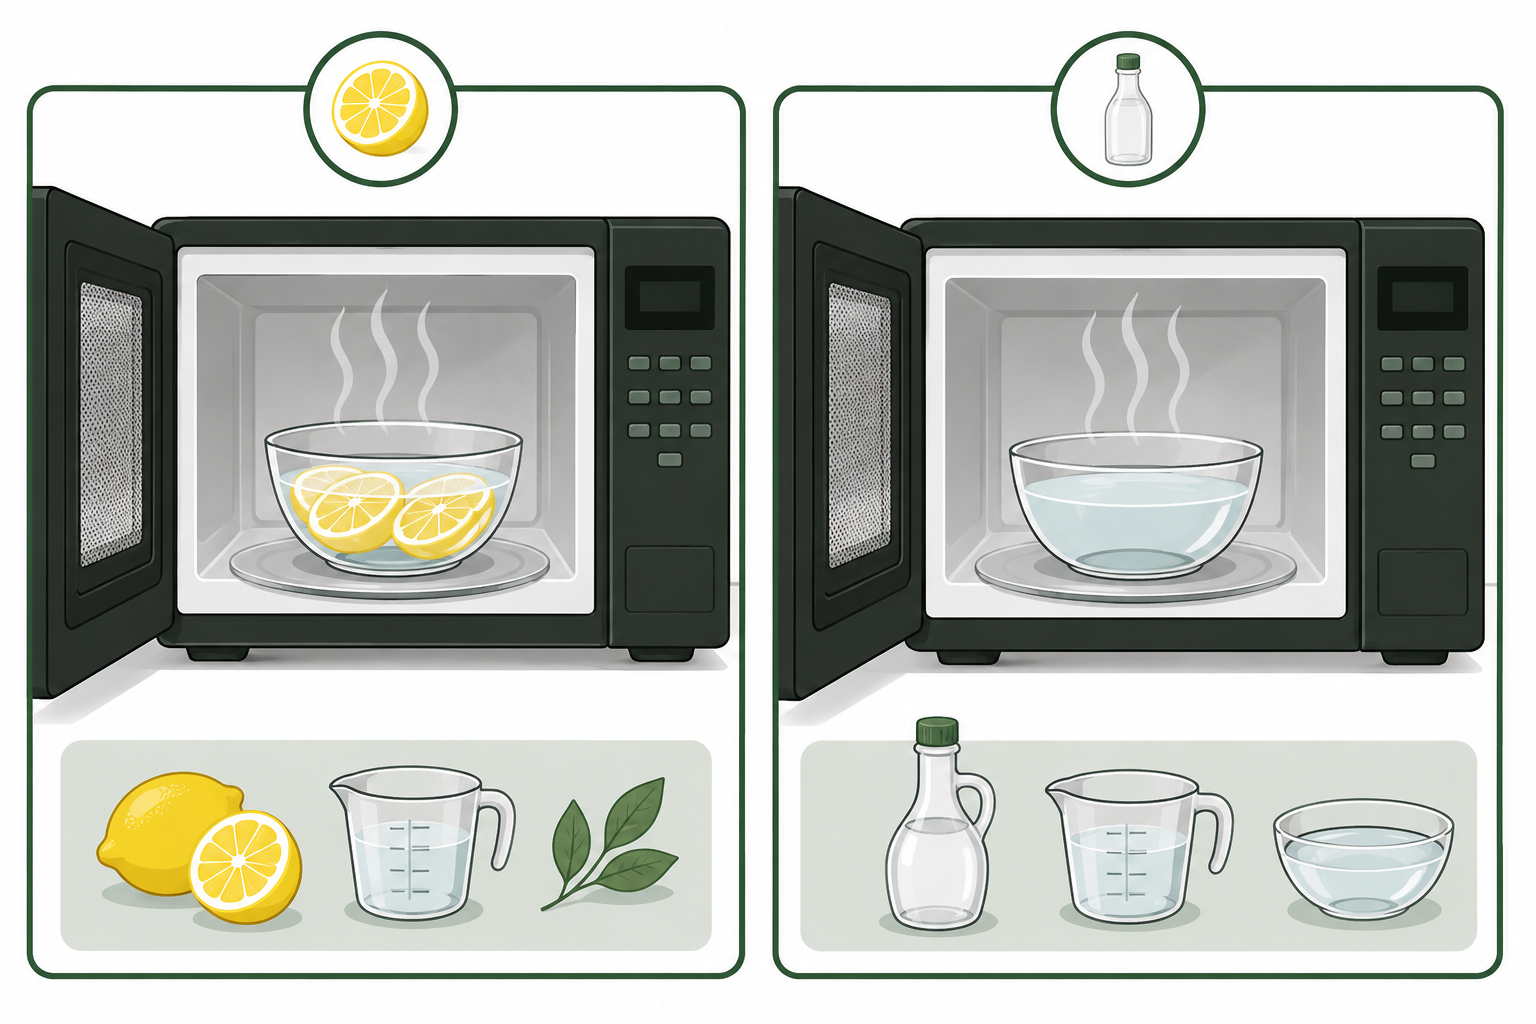
Step 2: Steam the interior Fill a microwave-safe bowl with roughly 200 to 300 millilitres of water and add either a few lemon slices or one to two tablespoons of white vinegar. Heat until the water is producing visible steam, usually for a few minutes depending on the microwave’s power. Follow the manufacturer’s instructions and monitor the bowl throughout, and do not allow it to boil dry.
Plain water heated on its own can occasionally become superheated without visibly boiling, and any disturbance can then cause a sudden, forceful release of steam, a risk noted in consumer guidance from Hong Kong’s Centre for Food Safety on microwave cooking. Adding lemon or vinegar to the water, and avoiding overheating, reduces this risk.
Step 3: Leave the door closed briefly After heating, leave the door closed for 5 to 10 minutes, then open it carefully and stand back from escaping steam, as both the bowl and the steam will be extremely hot. The trapped steam continues to soften dried residue on the walls and ceiling during this time, reducing the need for scrubbing later.
Step 4: Wipe the ceiling, walls and base Wipe the ceiling first, since splashes above eye level are commonly missed. Continue with the side walls and base, working from top to bottom so loosened residue does not spread to already-cleaned areas.
Step 5: Clean the door and seal Wipe the inside of the glass door and the door seal gently, without letting water pool at the edges. A lightly damp cloth is preferable to a wet one.
Step 6: Wash the turntable and roller ring Once cool, hand-wash both with warm water and a small amount of mild washing-up liquid. Cold glass should not be placed suddenly into very hot water, as a rapid temperature change can cause cracking.
Step 7: Dry and air the microwave Dry the interior thoroughly with a clean, dry cloth and leave the door open for a short period, where safe to do so, so residual moisture can evaporate before the appliance is used again.
Lemon vs Vinegar for Microwave Cleaning
| Method | Best For | Main Advantage | Possible Limitation | Safety Note |
|---|---|---|---|---|
| Lemon water | Light residue, mild everyday odours | Leaves a mild citrus scent and is suitable for light routine cleaning | Less effective on heavier grease or burnt residue | Bowl and steam will be very hot after heating |
| White vinegar and water | Tougher residue, stronger odours | Loosens dried-on food more effectively than water alone | Sharp smell during heating that fades after airing | Use diluted; avoid heating undiluted vinegar for long periods |
| Mild washing-up liquid | Turntable, roller ring and greasy marks | Helps remove grease from washable surfaces | Soap residue may remain if too much is used | Use a small diluted amount and wipe again with a clean damp cloth |
| Baking soda paste | Localised stubborn stains | Can help lift localised residue when applied gently, subject to the manufacturer’s cleaning instructions | Coatings vary between models, so check the manual before use | Do not heat baking soda dry inside the microwave |
| Plain steam | Quick refresh, no added ingredients | Simple and always available | Slower to loosen tougher, older residue | Handle the bowl and cavity carefully once heated |
None of these methods sterilise the microwave. They mainly loosen residue and reduce odours through cleaning and ventilation rather than through disinfection.
How to Remove Microwave Odours
Removing the source of a smell is generally more effective than masking it with scent.
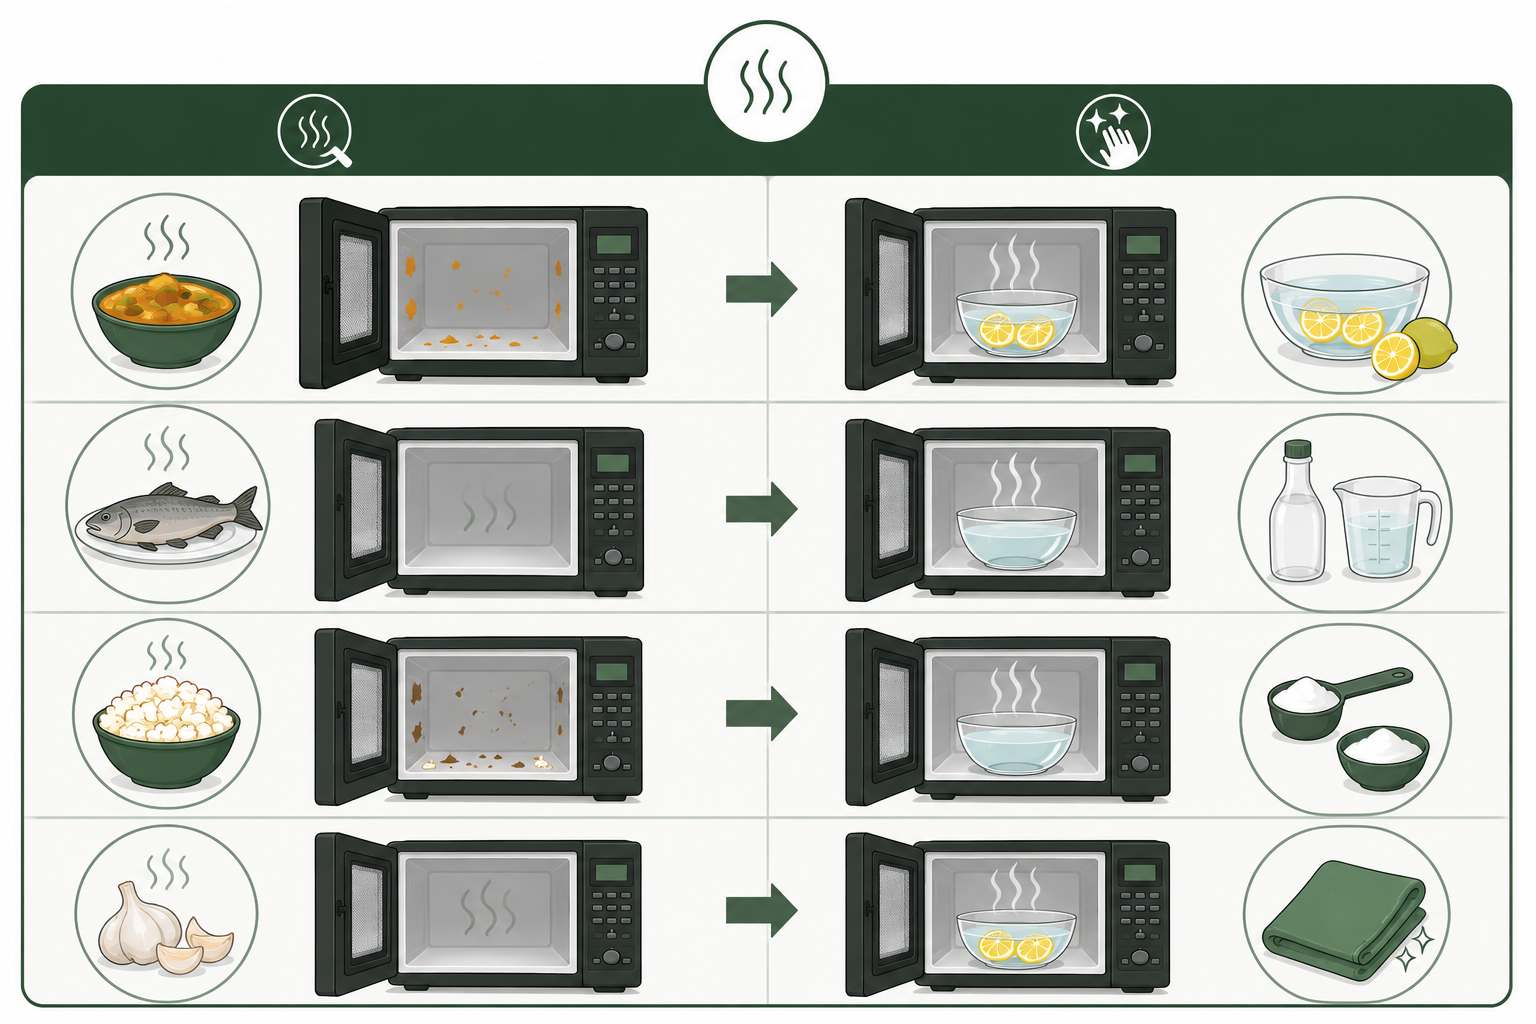
- Curry and spice smells: steam-clean as described above, then wipe thoroughly, since spice oils can cling to interior surfaces.
- Fish smells: combine steaming with a longer airing period, since fish odours tend to linger in enclosed spaces.
- Burnt popcorn: remove all burnt kernels first, then steam-clean and air the cavity for an extended period.
- Burnt food: clean away all charred residue before attempting any odour treatment.
- Garlic and onion: a vinegar steam cycle followed by thorough wiping generally addresses these smells.
- Sour or stale smells: often linked to old spills in less visible areas, such as the ceiling or door seal.
- Melted plastic odour: requires particular care, as described below.
If plastic has melted onto internal components, or an electrical burning smell remains after cleaning, the microwave should not continue to be used until it has been inspected. Do not scrape melted material from a waveguide cover, heating element or inaccessible internal surface.
How to Clean a Microwave After a Food Explosion
An overheated bowl, an uncovered sauce or a container left in too long can cause a sudden food explosion inside the cavity, spreading residue across the walls, ceiling and door at once. The same steam-and-wipe process applies, though a longer resting period and a second wipe-down are usually needed for the wider spread of residue. Larger spills should be left to cool completely before wiping begins, since splattered food and surrounding surfaces can retain heat longer than expected.
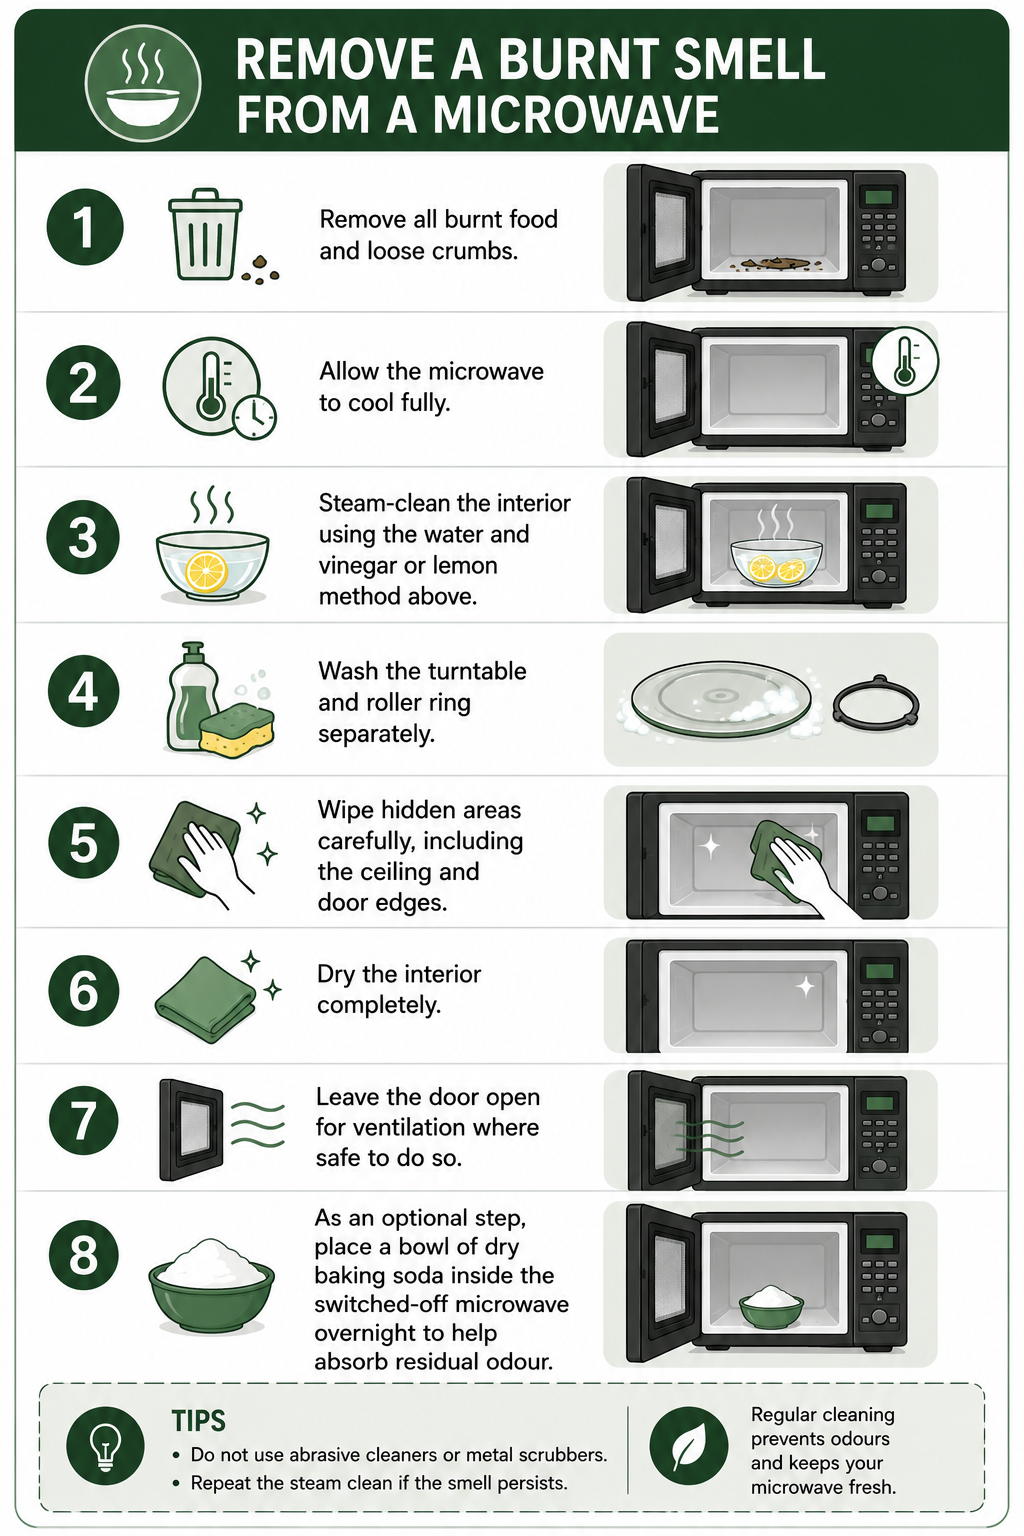
How to Remove a Burnt Smell From a Microwave
- Remove all burnt food and loose crumbs.
- Allow the microwave to cool fully.
- Steam-clean the interior using the water and vinegar or lemon method above.
- Wash the turntable and roller ring separately.
- Wipe hidden areas carefully, including the ceiling and door edges.
- Dry the interior completely.
- Leave the door open for ventilation where safe to do so.
- As an optional step, place a bowl of dry baking soda inside the switched-off microwave overnight to help absorb residual odour.
Baking soda should never be heated dry inside a microwave. A continuing electrical or plastic-burning smell may need professional inspection rather than further home cleaning.
How to Clean Stubborn Microwave Stains
Dried tomato sauce, grease, cheese, sugar syrup, caramelised residue, burnt splashes and turmeric or curry staining are among the most common stubborn marks reported in UAE kitchens. Repeated gentle cleaning with steam and a soft cloth is generally safer for the interior surface than aggressive scraping. For heavier build-up across the wider kitchen, a broader deep cleaning routine can help.
Some staining, particularly from turmeric or high-heat sugar spills, may leave a faint discolouration even once the surface is clean. This is a cosmetic result rather than a sign that the microwave is dirty or unsafe.
How to Clean the Microwave Exterior
- Control panel: wipe with a barely damp cloth, applying any cleaner to the cloth rather than spraying it directly onto the buttons.
- Handle: clean regularly, since it is touched frequently.
- Exterior door: wipe both the frame and the outer glass panel.
- Top and side panels: dust and wipe as part of a general kitchen cleaning routine.
- Ventilation areas: dust gently without inserting cloths or liquid into the vents.
For stainless-steel finishes, wiping in the direction of the grain generally gives a more even, streak-free result.
Microwave Cleaning Mistakes to Avoid
- Using bleach inside the cavity
- Using oven cleaner, which is not designed for microwave interiors
- Using abrasive scrubbers that can scratch interior coatings
- Scraping residue with knives or other sharp tools
- Spraying liquid directly into vents or control areas
- Overheating an empty bowl for longer than needed
- Using containers that are not microwave-safe
- Mixing different cleaning chemicals together
- Heating undiluted vinegar for extended periods
- Closing the door while the interior is still wet
- Ignoring damaged seals, sparking or unusual smells
- Removing internal panels or covers
How Often Should You Clean a Microwave?
| Task | Suggested Frequency |
|---|---|
| Wipe fresh spills | As soon as safely possible |
| Remove crumbs | Every few uses |
| Clean turntable | Weekly, or when visibly dirty |
| Steam-clean interior | Every 1 to 2 weeks, depending on use |
| Clean exterior controls | Weekly |
| Deep clean | Monthly, or when odours persist |
Actual frequency depends on cooking habits and how quickly spills are wiped away. A weekly cleaning checklist can help build this into a wider kitchen routine.
How to Prevent Microwave Smells
- Cover food with a vented microwave-safe cover.
- Place a plate or tray under bowls likely to overflow.
- Wipe spills before they have a chance to harden.
- Avoid overheating food beyond what is needed.
- Use shorter heating intervals for stronger-smelling dishes.
- Stir food between intervals to heat it more evenly.
- Allow steam to escape carefully rather than opening the door immediately.
- Leave the door slightly open briefly after strong-smelling food, where safe to do so.
- Clean the turntable and roller ring regularly.
- Avoid storing food inside the microwave between uses.
When Not to Use the Microwave
- Repeated sparking
- Smoke
- Exposed or damaged metal inside the cavity
- Peeling interior coating
- A damaged door or door seal
- An electrical burning smell
- Melted internal plastic
- Unusual buzzing
- Failure to heat food properly
- Moisture inside inaccessible electrical areas
Internal high-voltage components can remain dangerous even after a microwave has been unplugged, so opening the outer casing is not a routine cleaning task and should be left to a qualified technician.
Quick Microwave Cleaning Checklist
- Remove the turntable and loose crumbs
- Steam with water and lemon or diluted vinegar
- Leave the door closed briefly to loosen residue
- Wipe the ceiling first, then walls and base
- Clean the door and seal gently
- Hand-wash the turntable and roller ring
- Dry the interior fully
- Wipe the exterior and control panel
- Air the microwave before next use
- Check for sparks, smells or seal damage
This checklist also fits well into a quick reset before hosting, alongside a wider pre-guest cleaning routine.
Frequently Asked Questions
What is the safest way to clean the inside of a microwave?
The safest method is to steam the interior with water and lemon or diluted white vinegar, then wipe the softened residue away with a soft cloth, avoiding abrasive tools and harsh chemicals.
Can you clean a microwave with lemon?
Yes. Lemon slices heated in water produce steam that loosens light residue and leaves a mild citrus scent, though it is less effective on heavier grease than diluted vinegar.
Can you clean a microwave with vinegar?
Yes. Diluted white vinegar heated with water can help loosen tougher residue and reduce lingering odours, though undiluted vinegar should not be heated for extended periods.
How do you remove a burnt smell from a microwave?
Remove all burnt residue, steam-clean the interior, wash the turntable separately, dry the cavity fully, and consider an overnight bowl of dry baking soda as an optional odour absorber.
How do you remove curry smell from a microwave?
A vinegar or lemon steam cycle can reduce curry and spice odours after the food residue and oily film have been removed, particularly around the ceiling and walls.
Can baking soda be used inside a microwave?
Baking soda can be left inside a switched-off microwave overnight in an open bowl to help absorb odours, but it should never be heated dry inside the appliance.
Is it safe to use washing-up liquid in a microwave?
A very small, diluted amount of mild washing-up liquid can be applied to a cloth for wiping the interior, followed by a wipe with a clean damp cloth so no soap residue remains.
How do you clean the microwave ceiling?
After steaming the interior, wipe the ceiling first with a soft cloth, since splashes above eye level are commonly missed during routine cleaning.
How often should a microwave be cleaned?
Spills should be wiped as soon as safely possible, crumbs removed every few uses, and a full steam clean carried out roughly every one to two weeks, depending on how often the microwave is used.
When should you stop using a microwave and call a technician?
Stop using the microwave and arrange an inspection if there is sparking, smoke, exposed metal, a damaged seal, an electrical burning smell or melted internal plastic.
Conclusion
Safe microwave cleaning in the UAE depends on a few consistent habits: unplugging the appliance before manual wiping wherever accessible, loosening residue with gentle steam rather than force, avoiding abrasive tools and harsh chemicals, removing the source of odours rather than masking them, drying the interior fully, and recognising the signs that call for professional inspection rather than continued use. For a wider routine, see Kitchen Cleaning UAE.
Sources
General safety and cleaning guidance in this article draws on published consumer information from the U.S. Food and Drug Administration, which advises regular cleaning of the microwave cavity and door with water and a mild detergent and recommends against abrasive scourers; the UK Food Standards Agency, which covers general food safety and hygiene practice at home; and Hong Kong’s Centre for Food Safety, which addresses microwave cooking practices including the risk of superheated water.